
How to build a racing game - conclusion
Sat, Jun 30, 2012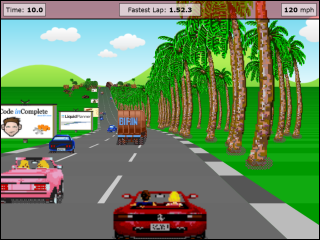
I previously introduced a simple outrun-style racing game and followed up with some ‘how to’ articles describing:
… and now we’re into the final lap! (groan). In this article we will add:
- Billboards and trees
- Other cars
- Collision detection
- Rudimentary car AI
- A HUD with lap timer and fastest lap
… which will give us just enough interactivity to justify finally calling this a ‘game’.
A note on code structure
I mentioned early on in this series that this is code for a tech demo with global variables and few classes/structures, it is certainly not an example of javascript best practices.
In this final section, as we add much more code for maintaining sprites and updating other cars, we cross that (subjective) boundary where previously simple code starts to become more complex and could benefit from a little more structure…
… but it wont get that structure because its just a tech demo, so please forgive the slightly messy code examples in this article, and trust that in a real project we would want to aggressively clean this up.
Sprites
In part 1, before our game loop started, we loaded a sprite sheet containing all of the cars, trees, and billboards.
You could create a sprite sheet manually in any image editor, but maintaining the images and calculating the coordinates is best done with an automated tool. In this case, my spritesheet was generated with a small Rake task using the sprite-factory Ruby Gem.
This task generates the unified sprite sheets from individual image files as well as calculating
the x,y,w,h coordinates to be stored in a SPRITES constant:
var SPRITES = {
  PALM_TREE:   { x:    5, y:    5, w:  215, h:  540 },
  BILLBOARD08: { x:  230, y:    5, w:  385, h:  265 },

  // ... etc

  CAR04:       { x: 1383, y:  894, w:   80, h:   57 },
  CAR01:       { x: 1205, y: 1018, w:   80, h:   56 },
};
Adding billboards and trees
We add an array to each road segment to contain our roadside sprites.
Each sprite consists of a source from the SPRITES collection along with a
horizontal offset which is normalized so that -1 indicates the left edge of
the road while +1 indicates the right edge of the road, allowing us to stay
independent of the actual roadWidth.
Some sprites are placed very deliberately, while others are randomized.
function addSegment() {
  segments.push({
    ...
    sprites: [],
    ...
  });
}

function addSprite(n, sprite, offset) {
  segments[n].sprites.push({ source: sprite, offset: offset });
}

function resetSprites() {

  addSprite(20,  SPRITES.BILLBOARD07, -1);
  addSprite(40,  SPRITES.BILLBOARD06, -1);
  addSprite(60,  SPRITES.BILLBOARD08, -1);
  addSprite(80,  SPRITES.BILLBOARD09, -1);
  addSprite(100, SPRITES.BILLBOARD01, -1);
  addSprite(120, SPRITES.BILLBOARD02, -1);
  addSprite(140, SPRITES.BILLBOARD03, -1);
  addSprite(160, SPRITES.BILLBOARD04, -1);
  addSprite(180, SPRITES.BILLBOARD05, -1);

  addSprite(240, SPRITES.BILLBOARD07, -1.2);
  addSprite(240, SPRITES.BILLBOARD06,  1.2);


  for(n = 250 ; n < 1000 ; n += 5) {
    addSprite(n, SPRITES.COLUMN, 1.1);
    addSprite(n + Util.randomInt(0,5), SPRITES.TREE1, -1 - (Math.random() * 2));
    addSprite(n + Util.randomInt(0,5), SPRITES.TREE2, -1 - (Math.random() * 2));
  }

  ...
}
NOTE: If we were building a real game we would want to build a road editor of some kind for visually creating a map with hills and curves and include a mechanism to place sprites along the road…. but for our purposes we can simply
addSprite()programatically.
Adding cars
In addition to our roadside sprites, we add a collection of the cars that occupy each segment. Along with a separate collection of all the cars on the track.
var cars      = [];  // array of cars on the road
var totalCars = 200; // total number of cars on the road

function addSegment() {
  segments.push({
    ...
    cars: [], // array of cars within this segment
    ...
  });
}
Maintaining 2 data structures for cars allows us to easily iterate over all the
cars during the update() method, moving them from one segment to another as
necessary, while at the same time allowing us to only render() the cars on
the visible segments.
Each car is given a random horizontal offset, z position, sprite source and speed:
function resetCars() {
  cars = [];
  var n, car, segment, offset, z, sprite, speed;
  for (var n = 0 ; n < totalCars ; n++) {
    offset = Math.random() * Util.randomChoice([-0.8, 0.8]);
    z      = Math.floor(Math.random() * segments.length) * segmentLength;
    sprite = Util.randomChoice(SPRITES.CARS);
    speed  = maxSpeed/4 + Math.random() * maxSpeed/(sprite == SPRITES.SEMI ? 4 : 2);
    car = { offset: offset, z: z, sprite: sprite, speed: speed };
    segment = findSegment(car.z);
    segment.cars.push(car);
    cars.push(car);
  }
}
Rendering hills (revisited)
In previous articles I talked about rendering road segments, including curves and hills, but there were
a few lines of code I glossed over regarding a maxy variable that started off at the bottom of the
screen, but decreased as we rendered each segment to indicate how much of the screen had already been
rendered:
for(n = 0 ; n < drawDistance ; n++) {

  ...

  if ((segment.p1.camera.z <= cameraDepth) || // behind us
      (segment.p2.screen.y >= maxy))          // clip by (already rendered) segment
    continue;

  ...

  maxy = segment.p2.screen.y;
}
This allows us to clip segments that would be obscured by already rendered hills.
A traditional painters algorithm would
normally render from back to front, having the nearer segments overwrite the further
segments. However we can’t afford to waste time rendering polygons that will ultimately
get overwritten, so it becomes easier to render front to back and clip far segments that
have been obscured by already rendered near segments if their projected coordinates are
lower than maxy.
Rendering billboards, trees and cars
However, iterating over the road segments front to back will not work when rendering sprites because they frequently overlap and therefore must be rendered back to front using the painters algorithm.
This complicates our render() method and forces us to loop over the road segments in two phases:
- front to back to render the road
- back to front to render the sprites
In addition to having to deal with sprites that overlap, we also need to deal with sprites that are ‘just over’ a hilltop horizon. If the sprite is tall enough we should be able to see the top of it even if the road segment it sits in is on the backside of the hill and therefore not rendered.
We can tackle this latter problem by saving the maxy value for each segment as a clip
line during phase 1. Then we can clip the sprites on that segment to the clip line during
phase 2.
The remainder of the rendering logic figures out how much to scale and position the sprite, based
on the road segments scale factor and screen coordinates (calculated in phase 1), leaving us with
something like this for the second phase of our render() method:
// back to front painters algorithm
for(n = (drawDistance-1) ; n > 0 ; n--) {
  segment = segments[(baseSegment.index + n) % segments.length];

  // render roadside sprites
  for(i = 0 ; i < segment.sprites.length ; i++) {
    sprite      = segment.sprites[i];
    spriteScale = segment.p1.screen.scale;
    spriteX     = segment.p1.screen.x + (spriteScale * sprite.offset * roadWidth * width/2);
    spriteY     = segment.p1.screen.y;
    Render.sprite(ctx, width, height, resolution, roadWidth, sprites, sprite.source, spriteScale, spriteX, spriteY, (sprite.offset < 0 ? -1 : 0), -1, segment.clip);
  }

  // render other cars
  for(i = 0 ; i < segment.cars.length ; i++) {
    car         = segment.cars[i];
    sprite      = car.sprite;
    spriteScale = Util.interpolate(segment.p1.screen.scale, segment.p2.screen.scale, car.percent);
    spriteX     = Util.interpolate(segment.p1.screen.x,     segment.p2.screen.x,     car.percent) + (spriteScale * car.offset * roadWidth * width/2);
    spriteY     = Util.interpolate(segment.p1.screen.y,     segment.p2.screen.y,     car.percent);
    Render.sprite(ctx, width, height, resolution, roadWidth, sprites, car.sprite, spriteScale, spriteX, spriteY, -0.5, -1, segment.clip);
  }

}
Colliding with billboards and trees
So now that we can add, and render, roadside sprites, we need to modify our update() method
to detect if the player has collided with any of the sprites in the players current segment:
We use a helper method Util.overlap() to provide a generic rectangle overlap detection and
if an overlap is detected we stop the car:
if ((playerX < -1) || (playerX > 1)) {
  for(n = 0 ; n < playerSegment.sprites.length ; n++) {
    sprite  = playerSegment.sprites[n];
    spriteW = sprite.source.w * SPRITES.SCALE;
    if (Util.overlap(playerX, playerW, sprite.offset + spriteW/2 * (sprite.offset > 0 ? 1 : -1), spriteW)) {
      // stop the car
      break;
    }
  }
}
NOTE: if you examine the real code you see that we dont actually stop the car because then they can no longer drive sideways around the obstacle, as a hack shortcut we keep their position fixed and allow the car to ‘slide’ sideways around the sprite.
Colliding with Cars
In addition to colliding with road side sprites, we need to detect collision with other cars, and if an overlap is detected we slow the player down and ‘bounce’ back behind the car that we collided with:
for(n = 0 ; n < playerSegment.cars.length ; n++) {
  car  = playerSegment.cars[n];
  carW = car.sprite.w * SPRITES.SCALE;
  if (speed > car.speed) {
    if (Util.overlap(playerX, playerW, car.offset, carW, 0.8)) {
      // slow the car
      break;
    }
  }
}
Updating Cars
To make the other cars drive along the road, we give them the simplest possible AI:
- drive at a constant speed
- automatically steer around the player when overtaking
- automatically steer around other cars when overtaking
NOTE: we don’t actually have to worry about steering other cars around curves in the road because the curves are fake. If we just keep the cars moving forward through our road segments they will automatically make it through the curves.
This all happens during the game update() loop with a call to updateCars() where we
move each car forward at constant speed and switch from one segment to the next if they
have driven far enough during this frame.
function updateCars(dt, playerSegment, playerW) {
  var n, car, oldSegment, newSegment;
  for(n = 0 ; n < cars.length ; n++) {
    car         = cars[n];
    oldSegment  = findSegment(car.z);
    car.offset  = car.offset + updateCarOffset(car, oldSegment, playerSegment, playerW);
    car.z       = Util.increase(car.z, dt * car.speed, trackLength);
    car.percent = Util.percentRemaining(car.z, segmentLength); // useful for interpolation during rendering phase
    newSegment  = findSegment(car.z);
    if (oldSegment != newSegment) {
      index = oldSegment.cars.indexOf(car);
      oldSegment.cars.splice(index, 1);
      newSegment.cars.push(car);
    }
  }
}
The updateCarOffset() method provides the ‘AI’ that allows a car to steer around the player
or another car. It is one of the more complex methods in the entire code base, and for a real
game would need to become a lot more complex to make the cars appear more realistic than they
do in this simple demo.
For our purposes we will stick to a naive, brute-force AI and have each car
- lookahead 20 segments
- if it detects a slower car ahead that overlaps, then steer around it
- steer to the right of obstacles that are on the left side of the road
- steer to the left of obstacles that are on the right side of the road
- steer enough to avoid the obstacle ahead within the distance remaining
We can also cheat with cars that are not visible to the player and simply skip any steering, letting those cars overlap and drive through each other. They only need to ‘be smart’ when in view of the player.
function updateCarOffset(car, carSegment, playerSegment, playerW) {

  var i, j, dir, segment, otherCar, otherCarW, lookahead = 20, carW = car.sprite.w * SPRITES.SCALE;

  // optimization, dont bother steering around other cars when 'out of sight' of the player
  if ((carSegment.index - playerSegment.index) > drawDistance)
    return 0;

  for(i = 1 ; i < lookahead ; i++) {
    segment = segments[(carSegment.index+i)%segments.length];

    if ((segment === playerSegment) && (car.speed > speed) && (Util.overlap(playerX, playerW, car.offset, carW, 1.2))) {
      if (playerX > 0.5)
        dir = -1;
      else if (playerX < -0.5)
        dir = 1;
      else
        dir = (car.offset > playerX) ? 1 : -1;
      return dir * 1/i * (car.speed-speed)/maxSpeed; // the closer the cars (smaller i) and the greater the speed ratio, the larger the offset
    }

    for(j = 0 ; j < segment.cars.length ; j++) {
      otherCar  = segment.cars[j];
      otherCarW = otherCar.sprite.w * SPRITES.SCALE;
      if ((car.speed > otherCar.speed) && Util.overlap(car.offset, carW, otherCar.offset, otherCarW, 1.2)) {
        if (otherCar.offset > 0.5)
          dir = -1;
        else if (otherCar.offset < -0.5)
          dir = 1;
        else
          dir = (car.offset > otherCar.offset) ? 1 : -1;
        return dir * 1/i * (car.speed-otherCar.speed)/maxSpeed;
      }
    }
  }
}
This algorithm works well enough in most cases, but if there is heavy traffic ahead we might find our cars rubberbanding left and then right as they try to squeeze through a gap between 2 other vehicles. There are many ways we can make this AI more robust, one of which might be to allow the cars to slow down when there is not enough room to steer around obstacles.
Heads up display
And finally, we add a rudimentary HTML heads up display (HUD):
<div id="hud">
  <span id="speed"            class="hud"><span id="speed_value" class="value">0</span> mph</span>
  <span id="current_lap_time" class="hud">Time: <span id="current_lap_time_value" class="value">0.0</span></span>
  <span id="last_lap_time"    class="hud">Last Lap: <span id="last_lap_time_value" class="value">0.0</span></span>
  <span id="fast_lap_time"    class="hud">Fastest Lap: <span id="fast_lap_time_value" class="value">0.0</span></span>
</div>
… style it with CSS:
#hud                   { position: absolute; z-index: 1; width: 640px; padding: 5px 0; font-family: Verdana, Geneva, sans-serif; font-size: 0.8em; background-color: rgba(255,0,0,0.4); color: black; border-bottom: 2px solid black; box-sizing: border-box; -moz-box-sizing: border-box; -webkit-box-sizing: border-box; }
#hud .hud              { background-color: rgba(255,255,255,0.6); padding: 5px; border: 1px solid black; margin: 0 5px; transition-property: background-color; transition-duration: 2s; -webkit-transition-property: background-color; -webkit-transition-duration: 2s; }
#hud #speed            { float: right; }
#hud #current_lap_time { float: left;  }
#hud #last_lap_time    { float: left; display: none;  }
#hud #fast_lap_time    { display: block; width: 12em;  margin: 0 auto; text-align: center; transition-property: background-color; transition-duration: 2s; -webkit-transition-property: background-color; -webkit-transition-duration: 2s; }
#hud .value            { color: black; font-weight: bold; }
#hud .fastest          { background-color: rgba(255,215,0,0.5); }
… and update() it during our game loop:
if (position > playerZ) {
  if (currentLapTime && (startPosition < playerZ)) {
    lastLapTime    = currentLapTime;
    currentLapTime = 0;
    if (lastLapTime <= Util.toFloat(Dom.storage.fast_lap_time)) {
      Dom.storage.fast_lap_time = lastLapTime;
      updateHud('fast_lap_time', formatTime(lastLapTime));
      Dom.addClassName('fast_lap_time', 'fastest');
      Dom.addClassName('last_lap_time', 'fastest');
    }
    else {
      Dom.removeClassName('fast_lap_time', 'fastest');
      Dom.removeClassName('last_lap_time', 'fastest');
    }
    updateHud('last_lap_time', formatTime(lastLapTime));
    Dom.show('last_lap_time');
  }
  else {
    currentLapTime += dt;
  }
}

updateHud('speed',            5 * Math.round(speed/500));
updateHud('current_lap_time', formatTime(currentLapTime));
Our updateHud() helper method allows us to only update DOM elements only if the value has changed
because updating DOM elements can be slow and we shouldn’t do it 60fps unless the actual values
have changed.
function updateHud(key, value) { // accessing DOM can be slow, so only do it if value has changed
  if (hud[key].value !== value) {
    hud[key].value = value;
    Dom.set(hud[key].dom, value);
  }
}
Conclusion
Phew! That was a long last lap, but there you have it, our final version has entered that stage where it can legitimately be called a game. It’s still very far from a finished game, but it’s a game nonetheless.
It’s quite astounding what it takes to actually finish a game, even a simple one. And this is not a project that I plan on polishing into a finished state. It should really just be considered how to get started with a pseudo-3d racing game.
The code is available on github for anyone who wants to try to turn this into a more polished racing game. You might want to consider:
- car sound fx
- better synchronized music
- full screen mode
- HUD fx (flash on fastest lap, confetti, color coded speedometer, etc)
- more accurate sprite collision
- better car AI (steering, braking etc)
- an actual crash when colliding at high speed
- more bounce when car is off road
- screen shake when off-road or collision
- throw up dirt particles when off road
- more dynamic camera (lower at faster speed, swoop over hills etc)
- automatic resolution & drawDistance detection
- more realistic projection based curves with x,y rotation
- fix the sub-pixel aliasing artifacts on curves
- smarter fog to cover sprites (blue against sky, cover sprites)
- multiple stages
- different maps
- a lap map, with current position indicator
- road splits and joins
- day/night cycle
- weather effects
- tunnels, bridges, clouds, walls, buildings
- city, desert, ocean
- add city of seattle and space needle to background layers
- ‘bad guys’ - add some competitor drivers to race against
- game modes - fastest lap, 1-on-1 racing, collect coins ? shoot bad guys ?
- a whole lot of gameplay tuning
- etc
- etc
- …
So there you have it. Another ‘weekend’ project that took a lot longer than expected but, I think, turned out pretty well in the end. These written up articles maybe had a little too much low level detail, but hopefully they still made some sense.
Comments and feedback are always welcome (below)
Enjoy!
Related Links
- read more about v1 - straight roads
- read more about v2 - curves
- read more about v3 - hills
- read more about v4 - final
- read Lou’s Pseudo 3d Page
- view the source code
or you can play…
- the straight road demo
- the curves demo
- the hills demo
- the final version