
How to build a racing game - hills
Tue, Jun 26, 2012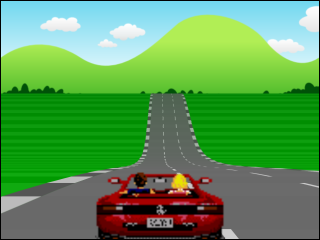
Previously I published a simple outrun-style pseudo-3d racing game and followed up with a couple of articles on how to get started with straight roads and curves.
This time around we’re going to tackle hills, and luckily it’s a lot easier than when we included curved roads.
In the earlier article we used a law of similar triangles to introduce 3d perspective projection:
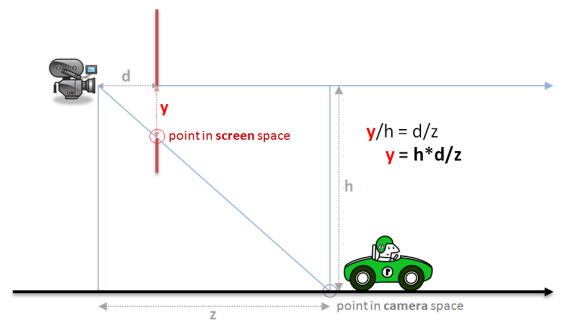
… which led us to our equations for projecting a 3d world coordinate into a 2d screen coordinate.
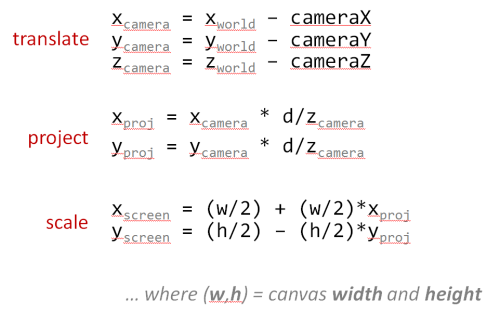
… but since we were only dealing with straight roads at the time our world coordinates only needed a z component because both x and y were zero.
This set us up nicely because now, to add hills into the mix, all we need to do is give
our road segments an appropriate non-zero y coordinate and our existing render()
function will just magically work.
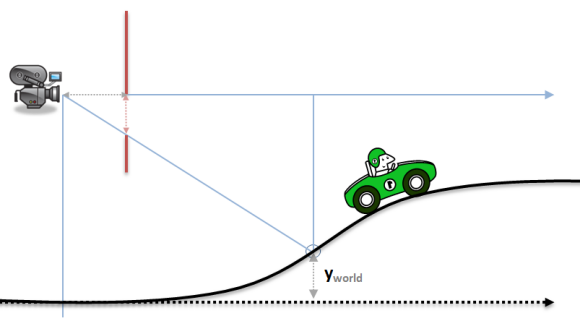
Yup. That’s really all we have to do to get hills. Add a y component to each road segments world coordinates.
Changes to the road geometry
We modify our existing addSegment method to allow p2.world.y to be provided by the
caller, while p1.world.y is set to match p2.world.y of the immediately preceding
segment:
function addSegment(curve, y) {
  var n = segments.length;
  segments.push({
     index: n,
        p1: { world: { y: lastY(), z:  n   *segmentLength }, camera: {}, screen: {} },
        p2: { world: { y: y,       z: (n+1)*segmentLength }, camera: {}, screen: {} },
     curve: curve,
     color: Math.floor(n/rumbleLength)%2 ? COLORS.DARK : COLORS.LIGHT
  });
}

function lastY() {
  return (segments.length == 0) ? 0 : segments[segments.length-1].p2.world.y;
}
Add some constants to represent LOW, MEDIUM or HIGH hills:
var ROAD = {
  LENGTH: { NONE: 0, SHORT:  25, MEDIUM:  50, LONG:  100 },
  HILL:   { NONE: 0, LOW:    20, MEDIUM:  40, HIGH:   60 },
  CURVE:  { NONE: 0, EASY:    2, MEDIUM:   4, HARD:    6 }
};
Modify our existing addRoad() method to accept a y argument that will
be used, along with easing functions, to gradually ease into and out of the
hill:
function addRoad(enter, hold, leave, curve, y) {
  var startY   = lastY();
  var endY     = startY + (Util.toInt(y, 0) * segmentLength);
  var n, total = enter + hold + leave;
  for(n = 0 ; n < enter ; n++)
    addSegment(Util.easeIn(0, curve, n/enter), Util.easeInOut(startY, endY, n/total));
  for(n = 0 ; n < hold  ; n++)
    addSegment(curve, Util.easeInOut(startY, endY, (enter+n)/total));
  for(n = 0 ; n < leave ; n++)
    addSegment(Util.easeInOut(curve, 0, n/leave), Util.easeInOut(startY, endY, (enter+hold+n)/total));
}
Finally, just like we did in the previous article with addSCurves(), we can layer on whatever
geometry building methods we like, such as:
function addLowRollingHills(num, height) {
  num    = num    || ROAD.LENGTH.SHORT;
  height = height || ROAD.HILL.LOW;
  addRoad(num, num, num,  0,  height/2);
  addRoad(num, num, num,  0, -height);
  addRoad(num, num, num,  0,  height);
  addRoad(num, num, num,  0,  0);
  addRoad(num, num, num,  0,  height/2);
  addRoad(num, num, num,  0,  0);
}
Changes to the update method
In an arcade game like this, where we are not attempting to simulate reality, the hills
don’t affect the player or the game world in any real way so there are no changes required for
the update() method.
Rendering hills
… and there are also no changes required for the render() method either since our projection
equations were already set up to project our road segments correctly with non-zero y coordinates
from the start.
Parallax scrolling background
Apart from adding y coordinates to all the road segments, the only other change we
might make is to ensure the background layers are offset vertically with the hills (as well
as horizontally with the curves). We do this with the addition of a final argument to
the Render.background helper.
The simplest mechanism is to simply offset it relative to the playerY position (which
needs to be interpolated from the world y positions of the players current segment).
This isn’t the most realistic behavior because we probably should take into account the slope of the players current road segment, but the effect is simple and works well enough for a simple demo.
Conclusion
So there you have it, we can now add real hills to our (fake) curves:

The work that went into v1 straight roads was really where we put into place the infrastructure for including true 3d projected hills in our demo… I just didn’t tell you that at the time.
Next up, in our final article, we will introduce sprites and add trees and billboards to the sides of the roads. We will also add other cars to race against, collision detection and record your ‘fastest lap’…
Related Links
- read more about v1 - straight roads
- read more about v2 - curves
- read more about v3 - hills
- read more about v4 - final
- read Lou’s Pseudo 3d Page
- view the source code
or you can play…
- the straight road demo
- the curves demo
- the hills demo
- the final version