
How to build a racing game - straight roads
Sat, Jun 23, 2012
Previously we introduced our outrun-style racing game, but how do we get started building a pseudo-3d racing game ?
Well, we’re going to need to
- revise some trigonometry
- revise basic 3d projection
- build a game loop
- load some sprite images
- build some road geometry
- render the background
- render the road
- render the car
- enable keyboard support to drive the car
Before we do any of that, lets go off and read Lou’s Pseudo 3d Page - its the main source of information (that I could find) online about how to build a pseudo-3d racing game.
NOTE: Lou’s page doesn’t render well in google chrome - so its best viewed using Firefox or IE
Finished reading Lou’s article ? Great! We’re going to build a variation on his ‘Realistic Hills Using 3d-Projected Segments’ approach. We will do it gradually, over the course of the next 4 articles, but we will start off here with v1, building very simple straight road geometry and projecting it onto our HTML5 canvas element.
see it in action here
Some Trigonometry
Before we get down to the implementation, lets use some basic trigonometry to remind ourselves how to project a point in a 3D world onto a 2D screen.
At its most basic, without getting into vectors and matrices, 3D projection uses a law of similar triangles. If we were to label:
- h = camera height
- d = distance from camera to screen
- z = distance from camera to car
- y = screen y coordinate
Then we could use the law of similar triangles to calculate
y = h*d/z
as shown in the diagram below:
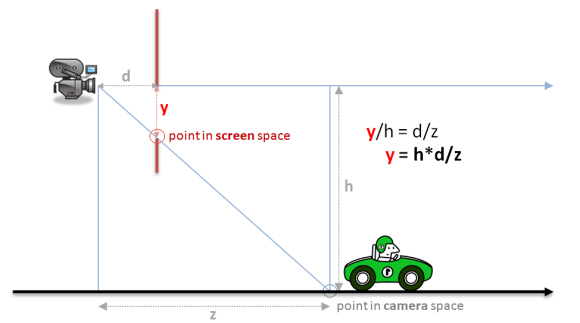
We could have also drawn a similar diagram from a top-down view instead of a side-on view and derived a similar equation for calculating the screen x coordinate as
x = w*d/z
Where w = half the width of the road (from camera to road edge)
You can see that for both x and y, what we are really doing is scaling by a factor of
d/z
Coordinate Systems
This sounds nice and simple in diagram form, but once you start coding its easy to get a little confused because we have been a bit loose in naming our variables and its not clear which represent 3d world coordinates and which represent 2d screen coordinates. We’ve also assumed that the camera is at the origin of our world when in reality it will be following our car.
More formally we should be:
- translating from world coordinates to camera coordinates
- projecting camera coordinates onto a normalized projection plane
- scaling the projected coordinates to physical screen (in our case canvas) coordinates
NOTE: in a true 3d system a rotation step would come between steps 1 and 2, but since we’re going to be faking curves we dont need to worry about rotation
Projection
And so we can present our formal projection equations as follows:
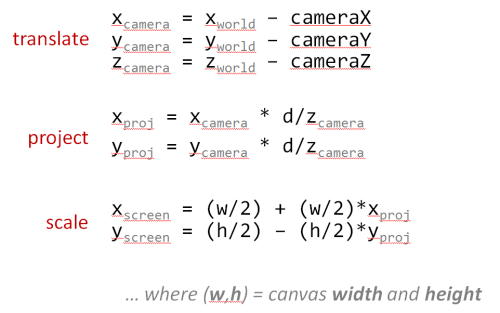
- The translate equations calculate the point relative to the camera
- The project equations are variations of our ’law of similar triangles’ above
- The scale equations take into account the difference between:
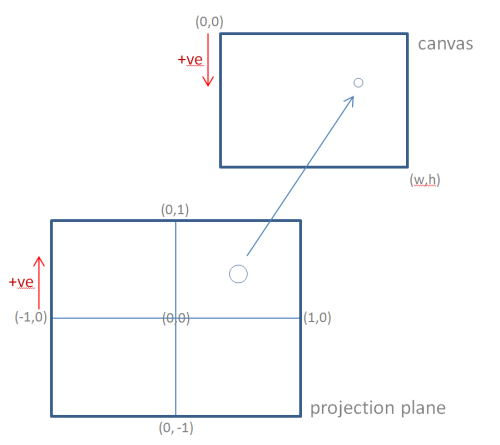
- math - where 0,0 is at the center and the y axis goes up and
- computers - where 0,0 is at the top-left and the y axis goes down, as shown below:
NOTE: In a full blown 3d system we would more formally define a
Vectorand aMatrixclass to perform more robust 3d mathematics, and if we were going to do that then we might as well just use WebGL (or equivalent)… but thats not really the point of this project. I really wanted to stick to old-school ‘just-enough’ pseudo-3d to build an outrun-style game.
Some More Trigonometry
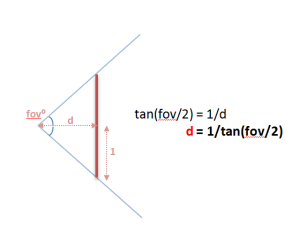
One last piece of the puzzle is how to calculate d - the distance from the camera to the projection plane.
Instead of hard coding a value for d, its more useful to derive it from the desired vertical field of view. This way we can choose to ‘zoom’ the camera if needed.
Assuming we are projecting onto a normalized projection plane, with coordinates from -1 to +1, we can calculate d as follows:
d = 1/tan(fov/2)
Setting up fov as one (of many) variables we will be able to tweak in order to fine tune the rendering algorithm.
Javascript Code Structure
I mentioned in the introduction that this code does not exactly
follow javascript best practices - its a quick and dirty demo with simple global variables and
functions. However, since I am going to build 4 separate versions (straights, curves, hills and sprites)
I will keep some re-usable methods inside common.js within the following modules:
- Dom - a few minor DOM helpers.
- Util - generic utilities, mostly math helpers.
- Game - generic game helpers such as an image loader and the game loop.
- Render - canvas rendering helpers.
I will only be detailing methods from common.js if they are relevent to the actual game, rather
than just simple DOM or math helpers. Hopefully you can tell from the name and context what the
methods are supposed to do.
As usual, the source code is the final documentation.
A Simple Game Loop
Before we can render anything, we need a game loop. If you’ve followed any of my previous game articles (pong, breakout, tetris, snakes or boulderdash) then you’ll have already seen examples of my favorite fixed time step game loop.
I won’t go into much detail here, I’ll simply re-use some of the code from my previous games to come up with a fixed time step game loop using requestAnimationFrame
The idea being that each of my 4 examples can call Game.run(...) and provide their own versions of
update- the game world with a fixed time step.render- the game world whenever the browser allows.
run: function(options) {

  Game.loadImages(options.images, function(images) {

    var update = options.update,    // method to update game logic is provided by caller
        render = options.render,    // method to render the game is provided by caller
        step   = options.step,      // fixed frame step (1/fps) is specified by caller
        now    = null,
        last   = Util.timestamp(),
        dt     = 0,
        gdt    = 0;

    function frame() {
      now = Util.timestamp();
      dt  = Math.min(1, (now - last) / 1000); // using requestAnimationFrame have to be able to handle large delta's caused when it 'hibernates' in a background or non-visible tab
      gdt = gdt + dt;
      while (gdt > step) {
        gdt = gdt - step;
        update(step);
      }
      render();
      last = now;
      requestAnimationFrame(frame);
    }
    frame(); // lets get this party started
  });
}
Again, this is a rehash of ideas from my previous canvas games, so if you need clarification on how the game loop works go back and read those earlier articles (or post a comment below!).
Images and Sprites
Before our game loop starts, we load 2 separate sprite sheets:
- background - 3 parallax layers for sky, hills and trees
- sprites - the car sprites (plus trees and billboards to add to the final version)
![]()
The spritesheet was generated with a small Rake task using the sprite-factory Ruby Gem.
This task generates the unified sprite sheets as well as the x,y,w,h coordinates to
be stored in the BACKGROUND and SPRITES constants.
NOTE: The backgrounds are home-made using Inkscape, while most of the sprites are placeholder graphics borrowed from the old genesis version of outrun and used here as teaching examples. If there are any pixel artists out there who want to provide original art to turn this into a real game please get in touch!
Game Variables
In addition to our background and sprite images we will need a number of game variables, including:
var fps           = 60;                      // how many 'update' frames per second
var step          = 1/fps;                   // how long is each frame (in seconds)
var width         = 1024;                    // logical canvas width
var height        = 768;                     // logical canvas height
var segments      = [];                      // array of road segments
var canvas        = Dom.get('canvas');       // our canvas...
var ctx           = canvas.getContext('2d'); // ...and its drawing context
var background    = null;                    // our background image (loaded below)
var sprites       = null;                    // our spritesheet (loaded below)
var resolution    = null;                    // scaling factor to provide resolution independence (computed)
var roadWidth     = 2000;                    // actually half the roads width, easier math if the road spans from -roadWidth to +roadWidth
var segmentLength = 200;                     // length of a single segment
var rumbleLength  = 3;                       // number of segments per red/white rumble strip
var trackLength   = null;                    // z length of entire track (computed)
var lanes         = 3;                       // number of lanes
var fieldOfView   = 100;                     // angle (degrees) for field of view
var cameraHeight  = 1000;                    // z height of camera
var cameraDepth   = null;                    // z distance camera is from screen (computed)
var drawDistance  = 300;                     // number of segments to draw
var playerX       = 0;                       // player x offset from center of road (-1 to 1 to stay independent of roadWidth)
var playerZ       = null;                    // player relative z distance from camera (computed)
var fogDensity    = 5;                       // exponential fog density
var position      = 0;                       // current camera Z position (add playerZ to get player's absolute Z position)
var speed         = 0;                       // current speed
var maxSpeed      = segmentLength/step;      // top speed (ensure we can't move more than 1 segment in a single frame to make collision detection easier)
var accel         =  maxSpeed/5;             // acceleration rate - tuned until it 'felt' right
var breaking      = -maxSpeed;               // deceleration rate when braking
var decel         = -maxSpeed/5;             // 'natural' deceleration rate when neither accelerating, nor braking
var offRoadDecel  = -maxSpeed/2;             // off road deceleration is somewhere in between
var offRoadLimit  =  maxSpeed/4;             // limit when off road deceleration no longer applies (e.g. you can always go at least this speed even when off road)
Some of these can be adjusted using the tweak UI controls to allow you to
vary some of the critical values at run-time to see what effect they have on the
rendered road. Others are derived from the tweakable UI values and recalculated
during the reset() method.
Driving a Ferrari
We provide a key mapping to Game.run that allows for simple keyboard
input that sets or clears variables to indicate any action the player
is currently taking:
Game.run({
  ...
  keys: [
    { keys: [KEY.LEFT,  KEY.A], mode: 'down', action: function() { keyLeft   = true;  } },
    { keys: [KEY.RIGHT, KEY.D], mode: 'down', action: function() { keyRight  = true;  } },
    { keys: [KEY.UP,    KEY.W], mode: 'down', action: function() { keyFaster = true;  } },
    { keys: [KEY.DOWN,  KEY.S], mode: 'down', action: function() { keySlower = true;  } },
    { keys: [KEY.LEFT,  KEY.A], mode: 'up',   action: function() { keyLeft   = false; } },
    { keys: [KEY.RIGHT, KEY.D], mode: 'up',   action: function() { keyRight  = false; } },
    { keys: [KEY.UP,    KEY.W], mode: 'up',   action: function() { keyFaster = false; } },
    { keys: [KEY.DOWN,  KEY.S], mode: 'up',   action: function() { keySlower = false; } }
  ],
  ...
}
The variables that manage the player’s state are:
- speed - the current speed.
- position - the current Z position down the track. Note this is actually the position of the camera, not the ferrari.
- playerX - the current X position across the road. Normalized from -1 to +1 to be independent of the actual
roadWidth.
These variables are set within the update method, which will:
- update
positionbased on currentspeed. - update
playerXif left or right arrow keys are pressed. - accelerate
speedif up arrow is pressed. - decelerate
speedif down arrow is pressed. - decelerate
speedif neither up or down arrows are pressed. - decelerate
speedifplayerXis off the sides of the road and into the grass.
For straight roads, the update method is pretty clean and simple:
function update(dt) {

  position = Util.increase(position, dt * speed, trackLength);

  var dx = dt * 2 * (speed/maxSpeed); // at top speed, should be able to cross from left to right (-1 to 1) in 1 second

  if (keyLeft)
    playerX = playerX - dx;
  else if (keyRight)
    playerX = playerX + dx;

  if (keyFaster)
    speed = Util.accelerate(speed, accel, dt);
  else if (keySlower)
    speed = Util.accelerate(speed, breaking, dt);
  else
    speed = Util.accelerate(speed, decel, dt);

  if (((playerX < -1) || (playerX > 1)) && (speed > offRoadLimit))
    speed = Util.accelerate(speed, offRoadDecel, dt);

  playerX = Util.limit(playerX, -2, 2);     // dont ever let player go too far out of bounds
  speed   = Util.limit(speed, 0, maxSpeed); // or exceed maxSpeed

}
Don’t worry, it will get much more complicated when we add sprites and collision detection in the final version :-)
Road Geometry
Before we can render our game world, we need to build up our array of
road segments within the resetRoad() method.
Each of these road segments will eventually be projected from their world coordinates to become a 2d polygon in screen coordinates. We store 2 points for each segment, p1 is the center of the edge closest to the camera, while p2 is the center of the edge farthest from the camera.
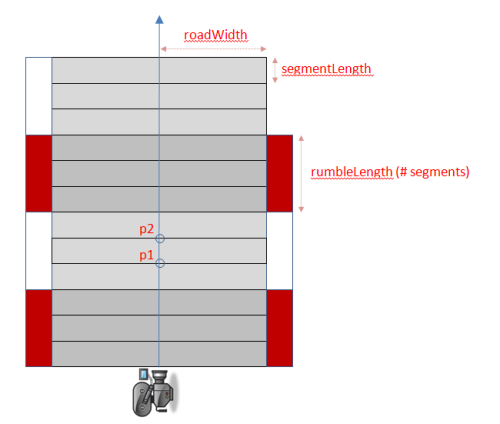
Technically, each segments p2 is identical to the previous sections p1 but we will find it easier to maintain them as separate points and transform each segment independently.
The reason we maintain a separate rumbleLength is so that we can have fine detailed
curves and hills but still have long rumble strips. If each alternating segment was
a different color it would create a bad strobe effect. So we want lots of small
segments, but group them together to form each rumble strip.
function resetRoad() {
  segments = [];
  for(var n = 0 ; n < 500 ; n++) { // arbitrary road length
    segments.push({
       index: n,
       p1: { world: { z:  n   *segmentLength }, camera: {}, screen: {} },
       p2: { world: { z: (n+1)*segmentLength }, camera: {}, screen: {} },
       color: Math.floor(n/rumbleLength)%2 ? COLORS.DARK : COLORS.LIGHT
    });
  }

  trackLength = segments.length * segmentLength;
}
We initialize p1 and p2 with only z world coordinates because we only need
straight roads. The y coordinates will always be 0, while the x coordinates
will always be based on a scaled +/- roadWidth. This will change later when we
add curves and hills.
We also setup empty objects to store the camera and screen representations
of these points to avoid creating lots of temporary objects during every render
- trying to keep our garbage collection to a minimum we want to avoid allocating objects inside our game loop whenever possible.
When the car reaches the end of the road we will simply loop back to the beginning. To make this a little easier we provide a method to find the segment for any Z value even if it extends beyond the length of the road:
function findSegment(z) {
  return segments[Math.floor(z/segmentLength) % segments.length];
}
Rending the Background
Our render() method starts with drawing a background image. In future articles when we add curves
and hills we will want the background to parallax scroll, so we start off in that direction here by
rendering the background as 3 seperate layers:
function render() {

  ctx.clearRect(0, 0, width, height);

  Render.background(ctx, background, width, height, BACKGROUND.SKY);
  Render.background(ctx, background, width, height, BACKGROUND.HILLS);
  Render.background(ctx, background, width, height, BACKGROUND.TREES);

  ...
Rending the Road
The render function then iterates over the segments, and projects each segment’s p1 and p2 from world coordinates to screen coordinates, clipping the segment if necessary, otherwise rendering it:
  var baseSegment = findSegment(position);
  var maxy        = height;
  var n, segment;
  for(n = 0 ; n < drawDistance ; n++) {

    segment = segments[(baseSegment.index + n) % segments.length];

    Util.project(segment.p1, (playerX * roadWidth), cameraHeight, position, cameraDepth, width, height, roadWidth);
    Util.project(segment.p2, (playerX * roadWidth), cameraHeight, position, cameraDepth, width, height, roadWidth);

    if ((segment.p1.camera.z <= cameraDepth) || // behind us
        (segment.p2.screen.y >= maxy))          // clip by (already rendered) segment
      continue;

    Render.segment(ctx, width, lanes,
                   segment.p1.screen.x,
                   segment.p1.screen.y,
                   segment.p1.screen.w,
                   segment.p2.screen.x,
                   segment.p2.screen.y,
                   segment.p2.screen.w,
                   segment.color);

    maxy = segment.p2.screen.y;
  }
We saw the math required to project a point earlier, the javascript version combines the translation, projection and scaling equations into a single method:
project: function(p, cameraX, cameraY, cameraZ, cameraDepth, width, height, roadWidth) {
  p.camera.x     = (p.world.x || 0) - cameraX;
  p.camera.y     = (p.world.y || 0) - cameraY;
  p.camera.z     = (p.world.z || 0) - cameraZ;
  p.screen.scale = cameraDepth/p.camera.z;
  p.screen.x     = Math.round((width/2)  + (p.screen.scale * p.camera.x  * width/2));
  p.screen.y     = Math.round((height/2) - (p.screen.scale * p.camera.y  * height/2));
  p.screen.w     = Math.round(             (p.screen.scale * roadWidth   * width/2));
}
In addition to calculating screen x and y for each of our p1 and p2 points we also use the same projection math to calculate the projected width (w) of the segment.
Given the screen x and y coordinates for both p1 and p2, along with
the projected road width w, it becomes fairly straight forward for the
Render.segment helper to calculate all the polygons it needs to render the
grass, road, rumble strips and lane separators using a generic Render.polygon
helper (see common.js)
Rendering the Car
Finally, the last thing required by the render method is to render the ferrari:
  Render.player(ctx, width, height, resolution, roadWidth, sprites, speed/maxSpeed,
                cameraDepth/playerZ,
                width/2,
                height);
The reason this method is named
playerinstead ofcaris because our final version of the game has other cars on the road, and we want to specifically differentiate the player’s ferrari from the other cars.
The Render.player helper ultimately uses the canvas drawImage method to
render a sprite after scaling it based on the same projection scaling we saw
earlier:
d/z
Where z in this case is the relative distance of the car from the camera stored in the playerZ variable.
It also ‘bounces’ the car a little at higher speeds by adding a little random-ness to the scaling equation based on speed/maxSpeed.
And boom there you have it:

Conclusion
Thats actually a fairly large chunk of work already just to get us setup with straight roads. We added…
- a common Dom helper module
- a common Util math helper module
- a common Render canvas helper module…
- … including
Render.segment,Render.polygonandRender.sprite - a fixed step game loop
- an image loader
- a keyboard handler
- a parallax layered background
- a spritesheet full of cars, trees and billboards
- some rudimentary road geometry
- an
update()method to drive a car - a
render()method to render background, road and player car - an HTML5
<audio>tag with some racing music (a hidden bonus!)
… but it gives us a good foundation to build on. The next 2 articles, describing curves and hills should be a little easier going, before getting more complex in the last article where we add sprites and collision detection.
Related Links
- read more about v1 - straight roads
- read more about v2 - curves
- read more about v3 - hills
- read more about v4 - final
- read Lou’s Pseudo 3d Page
- view the source code
or you can play…
- the straight road demo
- the curves demo
- the hills demo
- the final version