
Rotating Tower Rendering
Wed, Oct 30, 2013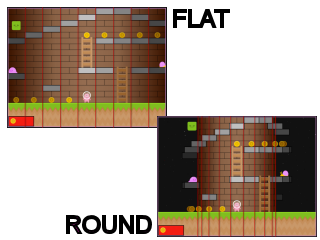
In the last article I walked through the foundation for my rotating tower platformer game. This time around I want to talk about how its rendered…
The important thing to realise is that the rendering is completely independent of
the game logic. The actual game update() loop, along with all the collision
detection logic is a simple, traditional, 2 dimensional platform game that doesn’t
care or know about the fact that its a rotating tower.
We can easily switch between the flat or the rotating tower by making a few simple changes in our rendering code.
You can play both versions here
If you are curious, once you’ve read through this article to learn how the rotating tower is rendered, you can look at the source code on github to see just how few changes are required (about 14 lines) to render a flat version instead of a rotating tower:
- source code diff - changes needed to render flat version
The Tower
Even though the game logic needs no knowledge of how it is rendered, that is obviously not true the other way around. So before we can talk about rendering we need to take a quick look at the data we use to represent the tower we are about to render.
Starting off with some constants to represent the viewport width and height, along with column and row sizes for our 2 dimensional grid:
var WIDTH      = 720,       // multiple of 360 keeps things lined up nicely...
    HEIGHT     = 540,       // ... and 4:3 w:h ratio matches canvas css
    HORIZON    = HEIGHT/5,  // how much ground to show below the tower
    METER      = HEIGHT/20, // how many pixels represent 1 meter
    COL_WIDTH  = METER * 3, // 2D column width
    ROW_HEIGHT = METER,     // 2D row height
Our Tower is initialized with:
- the number of rows and columns defined in the level map
- an inner radius - how wide should the tower be (walls)
- an outer radius - how wide should the tower be (including platforms)
- a total width
- a total height
- a map (2-d array of cell types e.g. platform, ladder, coin, air, etc)
var Tower = Class.create({

  initialize: function(level) {
    this.rows  = level.map.length;
    this.cols  = level.map[0].length;
    this.ir    = WIDTH/4;                  // inner radius (walls)
    this.or    = this.ir * 1.2;            // outer radius (walls plus platforms)
    this.w     = this.cols * COL_WIDTH;
    this.h     = this.rows * ROW_HEIGHT;
    this.map   = this.createMap(level.map);
  },

  ...
Wrapping Around
The only concession the game logic has to make to allow rendering as a rotating tower is to ensure that movement along the horizontal axis wraps when the left/right boundaries of the map are crossed.
This can be achieved by normalizing the result whenever we increment or decrement a horizontal axis related value. This generic method is provided within the common.js module:
normalize: function(n, min, max) {
  while (n < min)
    n += (max-min);
  while (n >= max)
    n -= (max-min);
  return n;
},
Given this generic method, we can normalize our game x-coordinates, or map column indices with two additional helper methods:
function normalizex(x)        { return normalize(x,   0, tower.w);    }  // wrap x-coord around to stay within tower boundary
function normalizeColumn(col) { return normalize(col, 0, tower.cols); }  // wrap column  around to stay within tower boundary
Utility Methods
In addition to normalizing, we provide more utility methods for frequently needed conversions:
- x-coordinate to column index (and vice versa)
- y-coordinate to row index (and vice versa)
- x-coordinate to 0-360 degree angle around tower
function x2col(x)   { return Math.floor(normalizex(x)/COL_WIDTH); }  // convert x-coord to tower column index
function y2row(y)   { return Math.floor(y/ROW_HEIGHT);            }  // convert y-coord to tower row    index
function col2x(col) { return col * COL_WIDTH;                     }  // convert tower column index to x-coord
function row2y(row) { return row * ROW_HEIGHT;                    }  // convert tower row    index to y-coord
function x2a(x)     { return 360 * (normalizex(x)/tower.w);       }  // convert x-coord to an angle around the tower
Transforming Coordinates
The following two utility methods, tx and ty are the core of how to render a rotating tower. They take the traditional 2-dimensional, x and y coordinates and transform them to viewport coordinates.
function tx(x, r) { return r * Math.sin((normalizex(x-camera.x)/tower.w) *2*Math.PI); }
function ty(y)    { return HEIGHT - HORIZON - (y - camera.y);                         }
NOTE: in this demo our HTML5 canvas size is set to our viewport size so that no further transformation is required.
Transforming Y
Let’s start with ty(y) because its easier to visualise.
We would like our logical y coordinate to represent the distance up from the ground, but then we must transform that into a canvas coordinate that is down from the top of the canvas (s.y):
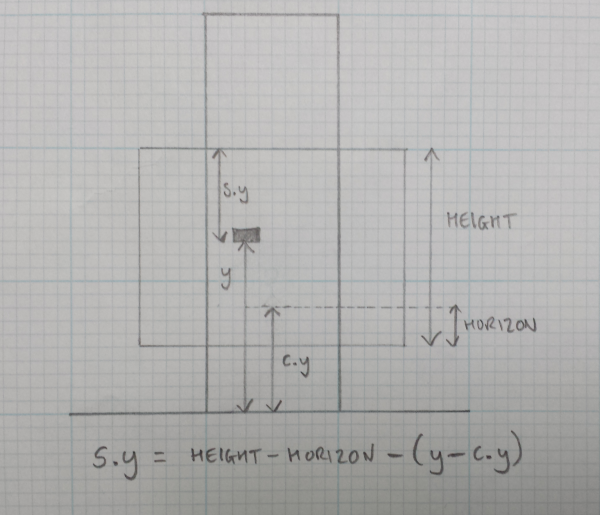
- HEIGHT is the viewport/canvas height
- HORIZON is a fixed distance from the bottom of the viewport for the camera
- y is the y coordinate of an entity, e.g. a platform
- c.y is the y coordinate of the camera
- s.y is the physical screen y coordinate we are trying to calculate
Therefore…
- y - c.y is the distance from the camera to the entity
- HEIGHT - HORIZON is the distance from the camera to the viewport top
Giving us our final implementation of ty:
function ty(y) {
  return HEIGHT - HORIZON - (y - camera.y);
}
Transforming X
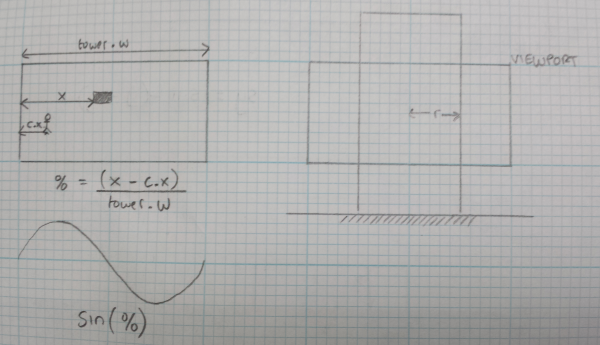
Now, let’s tackle tx(). It’s harder to visualize so let’s just walk through the math.
We want to transform an x-coordinate (that is between 0 and tower.width) into a position around a tower with radius r.
If we assume the screen x-origin is in the center of the viewport (achieved by translating the canvas by WIDTH/2) then we will need to transform our logical x-coordinate into a value between -r and +r.
- normalizex(x - camera.x) - horizontal distance between entity and camera
- …/tower.w to get a % (0 to 1)
- Math.sin(…) on the % gives a position around the tower (between -1 to 1)
- multiply by r to get the final screen x coordinate.
Giving us our final implementation of tx:
function tx(x, r) {
  return r * Math.sin((normalizex(x-camera.x)/tower.w) * 2*Math.PI);
}
It is important to note that this equation will work on entities both in front of, and behind, the tower. Both will end up with a transformed x coordinate between -r and +r. We will have to ensure we render them in the correct order so that entities behind the tower are hidden by the rendered tower wall, which leads us to…
The Painters Algorithm
Ok, so we can transform 2 dimensional coordinates into rotating tower viewport coordinates, great, now what ?
Since this is a simple canvas demo game, and we’re not using any fancy webgl, opengl, directx, three.js fancy shmantzy technologies, how do we render the tower and all its entities ?
We fall back on a traditional Painters Algorithm where we simply render the furthest items first, then the nearer items render over the top of them.
- render the background stars
- render any visible entities behind the tower (at the edges)
- render the tower wall itself
- render entities in front of the tower
We render the tower with a gradient to simulate a curved surface, and position our entities at the correct transformed coordinates and we can trick the eye into thinking its looking at a rotating tower!
Rendering the Tower
The trick to knowing which items are further than others is to recognize that each column in the 2 dimensional map is also a column around the tower.
If we imagine what the tower might look like from above, we can see that the column directly behind the tower (labelled 0) is the furthest, and the columns to either side (labelled 1) are a little nearer, and the columns to either side of those are a little nearer still, and so on:

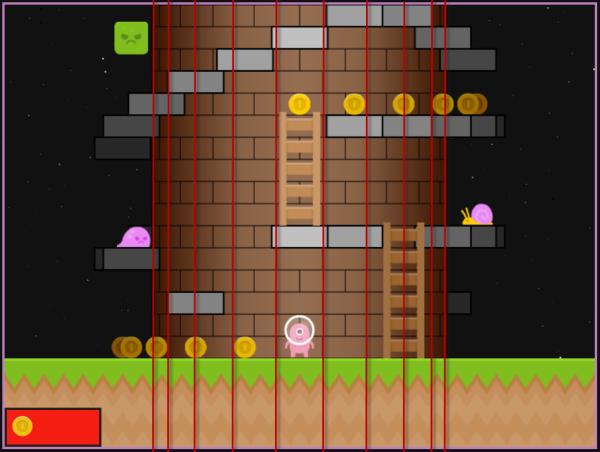
So, for example, when we render the back of the tower, we can walk from the center-back column to the edges, and when we render the front of the tower, we can do the opposite and walk from the outer edges towards the center-front column.
We end up rendering 4 different quadrants, 2 for the back, and 2 for the front, each quadrant is rendered 1 vertical column/slice at a time walking from the furthest away to the nearest.
renderFront: function() {

  var left   = x2col(camera.x - tower.w/4),
      center = x2col(camera.x),
      right  = x2col(camera.x + tower.w/4);

  this.renderQuadrant(left,  normalizeColumn(center + 0), +1);
  this.renderQuadrant(right, normalizeColumn(center - 1), -1);

},
As we walk through the columns and rows for each quadrant, we can identify the contents of each cell and render it appropriately:
renderQuadrant: function(min, max, dir) {
  var y, cell, row, col = min;
  while (col != max) {
    for(row = 0 ; row <= tower.rows ; row++) {
      y = ty(row * ROW_HEIGHT);
      cell = tower.getCell(row, col);
      if (cell.platform)
        this.renderPlatform(col, y);
      else if (cell.ladder)
        this.renderLadder(col, y);
      else if (cell.coin)
        this.renderCoin(col, y);
      if (cell.monster)
        this.renderMonster(col, y, cell.monster);
    }
    col = normalizeColumn(col + dir);
  }
},
For example, to render a platform in a particular column at a (transformed) y position:
renderPlatform: function(col, y) {

  var x = col2x(col + 0.5),            // center of the column
      x0 = tx(x, tower.or),            // transformed center
      x1 = x0 - this.platformWidth/2,  // left edge
      x2 = x0 + this.platformWidth/2;  // right edge

  ctx.fillRect(  x1, y - ROW_HEIGHT, x2 - x1, ROW_HEIGHT);
  ctx.strokeRect(x1, y - ROW_HEIGHT, x2 - x1, ROW_HEIGHT);

},
Other entities, monsters, ladders, coins, etc, are rendered in a similar fashion. The code in this article has been simplified a little for clarity, so as always, refer to the source code for the final implementation.
Next Time…
I have shown that how the game is rendered can (and should) be completely independent of how the core game logic is implemented. The only concession needed to render as a rotating tower is to ensure that the game’s horizontal coordinates wrap around when the boundaries are reached.
Given a traditional 2-dimensional grid of cells, rendering the platform game onto a rotating tower becomes largely a question of being able to transfrom x and y game coordinates to screen coordinates using a little Trigonometry.
In the next (and probably final) article I’ll take a closer look at the collision detection process.
Again, it is independent of how the game is rendered, so the fact that its a rotating tower is irrelevant, but its using a slightly more complex collision detection process than my previous tiny platformer, so it’s worth a closer look.
In the mean time, you can…
- play the game
- play the game (in flat mode)
- view the source code
- read the original article
- read more about the game foundations
Enjoy!