
Javascript Gauntlet - Level Maps
Thu, May 9, 2013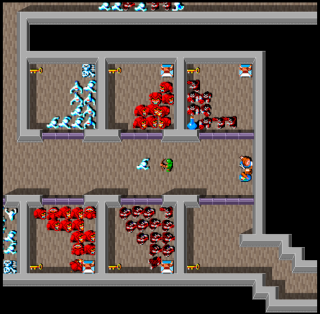
Gauntlet is a top-down dungeon crawler that needs lots of different level maps.
I originally imagined that I would build a simple level editor that generated some kind of JSON data structure, but to get started, I prototyped a simpler idea …
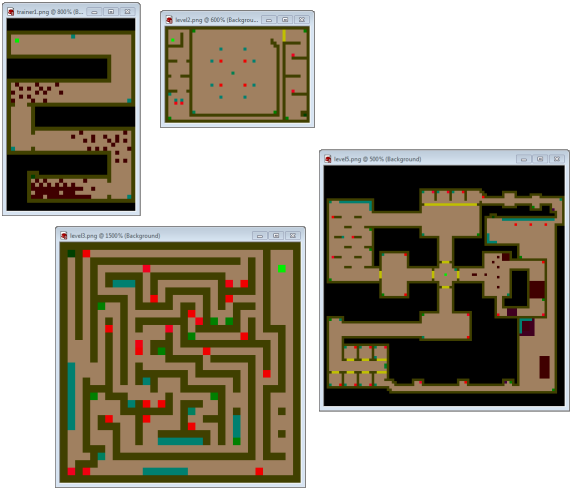
Why not just use a normal paint tool to build the maps, use the HTML5 <canvas> API to getImageData
and use different pixel colors for different tiles such as walls, generators,
treasure etc.
Although it was always supposed to be a temporary solution, I found that, as long as the number of different tile types stayed fairly small, it worked quite well. Particularly for the simple maps of a Gauntlet-style game…. and it turned out I never did need to build a dedicated level editor.
Down Side ?
The main down-side to this approach is that you have to remember which colors represent which entities while editing the maps. So you end up doing a lot of cut-and-paste, and obviously this approach doesn’t scale to games with hundreds of different entity types, but in Gauntlet there are only about 20, so it stays just about manageable.
It also helps, while editing, to have a reference key image from which to sample the color before painting it onto the level, as shown in the image below:
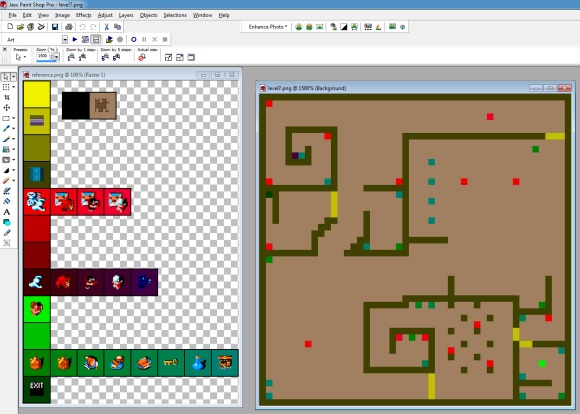
This was only a minor inconvenience for a game of this small-scale. So lets take a look at how it all works…
Loading an Image
Using this approach, the first thing you need to be able to do is load the raw source image that
represents the level. This is easy since we already have a createImage helper method in our base
game library that takes a url and makes a callback once the image has loaded:
createImage: function(url, onload) {
  options = options || {};
  var image = document.createElement('img');
  image.on('load', onload);
  image.src = url;
  return image;
},
So we might start a new level in our game something like this:
level.source = Game.createImage(level.url, { onload: function() {
  // source image has loaded, now we need to parse it...
}});
Parsing an Image
Once the image has loaded, we need a way to parse the pixel data. Since this could be useful in other situations, and other games, it makes sense to separate out:
- Parsing the image pixel data
- Setting up the gauntlet level map
In fact, lets create a generic Game.parseImage method that can be re-used by
providing a callback function that will be called for each pixel in the image.
parseImage: function(image, callback) {
  var tx, ty, index, pixel,
      tw      = image.width,
      th      = image.height,
      canvas  = Game.renderToCanvas(tw, th, function(ctx) { ctx.drawImage(image, 0, 0); }),
      ctx     = canvas.getContext('2d'),
      data    = ctx.getImageData(0, 0, tw, th).data,
      helpers = {
        valid: function(tx,ty) { return (tx >= 0) && (tx < tw) && (ty >= 0) && (ty < th); },
        index: function(tx,ty) { return (tx + (ty*tw)) * 4; },
        pixel: function(tx,ty) { var i = this.index(tx,ty); return this.valid(tx,ty) ? (data[i]<<16)+(data[i+1]<<8)+(data[i+2]) : null; }
      }

  for(ty = 0 ; ty < th ; ty++)
    for(tx = 0 ; tx < tw ; tx++)
      callback(tx, ty, helpers.pixel(tx,ty), helpers);
},
NOTE: (tx,ty,tw,th) represent tile coordinates, in future articles when we discuss entity movement and collision detection (x,y,w,h) will represent sub-tile pixel coordinates.
In this method we:
- extract the image width & height
- render the image to a temporary
<canvas> - extract the raw pixel imageData
- provide 3 helper methods to do some low level pixel bit manipulation
- iterate through all the pixels, calling the callback once for each pixel
Rendering the source image to a temporary <canvas> is achieved via an existing method that
we already have in our base game library:
renderToCanvas: function(width, height, render) {
  var canvas = document.createElement('canvas');
  canvas.width = width;
  canvas.height = height;
  render(canvas.getContext('2d'));
  return canvas;
},
The 3 helper methods DRY up some common bit manipulation that we will need to do on the pixel data:
- valid(tx,ty) - are these tile coordinates valid, or are they out of bounds
- index(tx,ty) - which entry in the imageData represents this tile
- pixel(tx,ty) - what is the pixel color for this tile
You can find a little more information on canvas pixel manipulation here
Setting up the Gauntlet Map
Now that we have our common Game.parseImage method, we can use it to setup our gauntlet
levels. We can start off by declaring the different colors and some helpful bitmasks.
PIXEL = {
  NOTHING:        0x000000, // BLACK
  DOOR:           0xC0C000, // YELLOW
  WALL:           0x404000, // DARK YELLOW
  GENERATOR:      0xF00000, // RED
  MONSTER:        0x400000, // DARK RED
  START:          0x00F000, // GREEN
  TREASURE:       0x008000, // MEDIUM GREEN
  EXIT:           0x004000, // DARK GREEN
  MASK: {
    TYPE:         0xFFFF00,
    SUBTYPE:      0x0000FF
  }
}
We will split the pixel color into a high 16 bit value that represents the tile type (DOOR, WALL, MONSTER, etc) plus a low 8-bit value that represents a sub-type (e.g. which type of MONSTER)
Given these constants we can setup a Gauntlet level with a few helper methods:
setupLevel: function(source) {

  function is(pixel, type) { return ((pixel & PIXEL.MASK.TYPE) === type); };
  function type(pixel)     { return  (pixel & PIXEL.MASK.SUBTYPE) >> 4;   };

  function iswall(pixel)         { return is(pixel, PIXEL.WALL);      };
  function isstart(pixel)        { return is(pixel, PIXEL.START);     };
  function isdoor(pixel)         { return is(pixel, PIXEL.DOOR);      };
  function isexit(pixel)         { return is(pixel, PIXEL.EXIT);      };
  function isgenerator(pixel)    { return is(pixel, PIXEL.GENERATOR); };
  function ismonster(pixel)      { return is(pixel, PIXEL.MONSTER);   };
  function istreasure(pixel)     { return is(pixel, PIXEL.TREASURE);  };

  Game.parseImage(source, function(tx, ty, pixel) {

    if (isstart(pixel))
      setStart(tx, ty);
    else if (iswall(pixel))
      addWall(tx, ty);
    else if (isexit(pixel))
      addExit(tx, ty);
    else if (isdoor(pixel))
      addDoor(tx, ty)
    else if (isgenerator(pixel))
      addGenerator(tx, ty, MONSTERS[type(pixel)]);
    else if (istreasure(pixel))
      addTreasure(tx, ty, TREASURES[type(pixel)]);
    else if (ismonster(pixel))
      addMonster(tx, ty, MONSTERS[type(pixel)]);
  });
NOTE: this is a simplified version of the actual code for clarity
Next Time…
We just walked through building a common game.parseImage method to iterate over
every pixel in an image in order to build up our game level. The addWall, addDoor,
addGenerator (etc) methods referenced in the previous code will be used to create the
game’s entities…
… which will be the subject of the next article.
Related Links
- play the game
- view the source code
- read more about game foundations
- read more about game level maps
- read more about game entities
- read more about game collision detection
- read more about game logic